> For the complete documentation index, see [llms.txt](https://docs-kr.zep.us/llms.txt). Markdown versions of documentation pages are available by appending `.md` to page URLs; this page is available as [Markdown](https://docs-kr.zep.us/zep-script-api/zepscriptapi/scriptapp/callbacks.md).
# Callbacks
### 소개
스크립트 개발자가 지정한 키를 플레이어가 눌렀을 때 또는 스크립트 개발자가 지정한 지점에 도착했을 때 등, 조건을 설정하여 플레이어가 조건을 달성했을 경우 동작하는 함수들 입니다.
이름
설명
runLater
지정한 시간(초) 후 동작하는 함수 입니다.
addOnTileTouched
지정한 x, y 좌표에 플레이어가 도착했을 때 실행되는 함수입니다.
addOnLocationTouched
지정한 ‘지정영역’에 플레이어가 도착했을 때 실행되는 함수입니다.
addOnKeyDown
플레이어가 지정된 키를 눌렀을 때 실행되는 함수 입니다.
setTimeout
지정한 시간(ms) 후 함수를 실행합니다.
setInterval
지정한 시간(ms) 간격으로 함수를 실행합니다.
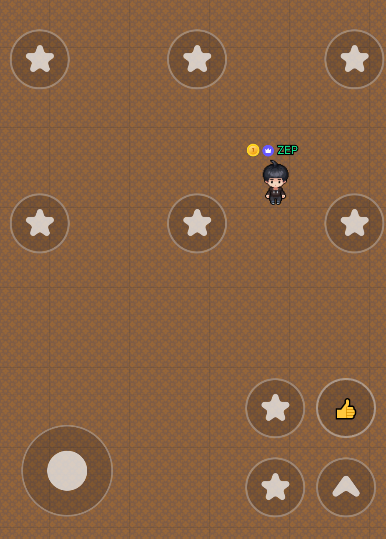
addMobileButton
모바일 환경에서 커스텀 모바일 버튼을 추가하고, 버튼을 눌렀을 때 동작하는 함수를 지정합니다.
putMobilePunch
모바일 환경에서 펀치 버튼을 추가합니다.
putMobilePunchWithIcon
로드한 이미지로 펀치 버튼을 만들어 추가합니다.
## 📚 API 설명 및 예제
**Callbacks 함수 한 눈에 보기**
```javascript
// time(초) 후에 callback 함수를 실행
App.runLater(callback, time: number)
// 플레이어가 해당 위치의 타일과 부딪혔을 때 실행
App.addOnTileTouched(x: number, y: number, callback)
// 플레이어가 지정한 위치와 부딪혔을 때 실행
App.addOnLocationTouched(name: string, callback)
// 플레이어가 지정된 키를 눌렀을 때 실행
App.addOnKeyDown(keycode : number, callback);
// time(ms) 후에 callback 함수를 실행
setTimeout(callback, time: number)
// time(ms) 후 함수를 실행
setInterval(callback, time: number)
// 모바일 환경에서 커스텀 모바일 버튼을 추가하고, 버튼을 눌렀을 때 동작하는 함수를 지정
App.addMobileButton(anchor: number, posX: number, posY: number, function(player){} )
// 모바일 환경에서 펀치 버튼 추가/제거합니다.
App.putMobilePunch(enable: boolean = true)
// 로드한 이미지로 펀치 버튼을 만들어 추가합니다.
App.putMobilePunchWithIcon(icon: ScriptDynamicResource)
```
####
### runLater
{% hint style="info" %}
App.runLater(function(){}, time: number);
{% endhint %}
time(초) 후에 callback 함수를 실행합니다.
**파라미터**
이름
타입
설명
time
Number
몇 초 후에 실행 될 지를 정하는 시간 (초)
**예제**
앱이 시작되고 5초 후 메시지 출력해보기
```jsx
App.onStart.Add(function () {
App.runLater(function() {
App.showCenterLabel("메시지");
}, 5);
});
```
####
### addOnTileTouched
{% hint style="info" %}
App.addOnTileTouched(x: number, y: number, function(player){})
{% endhint %}
지정한 x, y좌표에 플레이어가 도착할 경우 callback 함수를 실행합니다.
**파라미터**
이름
타입
설명
x, y
number
지정 할 x, y 좌표
**예제**
플레이어가 지정 좌표에 도착 했을 때 메시지 출력해보기
```jsx
// 플레이어가 5, 5 좌표에 도착한 경우
App.addOnTileTouched(5, 5, function (player) {
App.showCenterLabel(`${player.name}님이 (5, 5) 좌표에 도착!`);
});
```
####
### addOnLocationTouched
{% hint style="info" %}
addOnLocationTouched(name: string, function(player){})
{% endhint %}
플레이어가 맵에디터에서 지정한 ‘지정영역’에 도착했을 때 callback 함수를 실행합니다.
**파라미터**
이름
타입
설명
name
String
맵 에디터에서 지정한 ‘지정 영역’의 이름
player
Player
지정 영역에 도착한 플레이어를 가르킴 파라미터의 이름은 임의로 지정 가능
**예제**
플레이어가 지정 영역에 도착했을 때 메시지 출력해보기
```jsx
// 플레이어가 이름이 "myLocation"인 영역에 도착했을 때 실행
App.addOnLocationTouched("myLocation", function(player){
App.showCenterLabel(`${player.name}님이 myLocation에 도착했습니다.`)
});
```
####
### addOnKeyDown
{% hint style="info" %}
App.addOnKeyDown(keycode : number, function(player){});
{% endhint %}
플레이어가 지정된 키를 눌렀을 때 callback 함수를 실행합니다.
**파라미터**
**예제**
a를 눌렀을 때 메시지 출력해보기 ( a의 키코드: 65 )
```jsx
// 플레이어가 a를 눌렀을 때 실행
App.addOnKeyDown(65, function(player){
App.sayToAll(`${player.name}님이 a키를 눌렀습니다.`)
});
```
####
### setTimeout
{% hint style="info" %}
setTimeout(function(){}, time: number);
{% endhint %}
time(ms) 후에 callback 함수를 실행합니다.
**파라미터**
이름
타입
설명
time
Number
callback 함수 실행 전 대기 시간 (ms)
**예제**
앱이 시작되고 5초 후 메시지 출력해보기
```jsx
App.onStart.Add(function () {
setTimeout(function () {
App.sayToAll("5초후 메시지 출력");
}, 5000);
});
```
####
### setInterval
{% hint style="info" %}
setInterval(function(){}, time: number);
{% endhint %}
time(ms) 간격으로 callback 함수를 실행합니다.
**파라미터**
이름
타입
설명
time
Number
callback 함수 실행 주기 (ms)
**예제**
앱이 시작되고 1초 간격으로 메시지 출력해보기
```jsx
let time = 0;
App.onStart.Add(function () {
setInterval(function () {
App.sayToAll(`앱 실행 ${++time}초 경과`);
}, 1000);
});
```
####
### addMobileButton
{% hint style="info" %}
App.addMobileButton( anchor: number, posX: number, posY: number, function(player){} )
{% endhint %}
모바일 환경에서 커스텀 모바일 버튼을 추가하고, 버튼을 눌렀을 때 동작하는 함수를 지정합니다.
> 모바일버튼의을이미지를 원하는 이미지로 변경 할 수 있습니다.
>
> [모바일버튼 이미지 변경하기](/creator/reference/mobilebutton-image.md)
**파라미터**
App.onStart.Add(function () {
	// Bottom_Right
	App.addMobileButton(8, 145, 75, function (player) {
		App.sayToAll(`${player.name}, Bottom 버튼A`);
	});
	// Bottom_Right
	App.addMobileButton(8, 145, -20, function (player) {
		App.sayToAll(`${player.name}, Bottom 버튼B`);
	});
	// Top
	App.addMobileButton(0, 0, 400, function (player) {
		App.sayToAll(`${player.name}, TOP 버튼`);
	});
	// Top_Left
	App.addMobileButton(1, 50, 400, function (player) {
		App.sayToAll(`${player.name}, TOP_LEFT 버튼`);
	});
	// Top_right
	App.addMobileButton(2, 50, 400, function (player) {
		App.sayToAll(`${player.name}, TOP_RIGHT 버튼`);
	});
	// Middle
	App.addMobileButton(3, 0, 100, function (player) {
		App.sayToAll(`${player.name}, MIDDLE 버튼`);
	});
	// Middle_left
	App.addMobileButton(4, 50, 100, function (player) {
		App.sayToAll(`${player.name}, MIDDLE LEFT 버튼`);
	});
	// Middle_right
	App.addMobileButton(5, 50, 100, function (player) {
		App.sayToAll(`${player.name}, MIDDLE RIGHT 버튼`);
	});
});
###
### putMobilePunch
{% hint style="info" %}
App.putMobilePunch(enable: boolean = true)
{% endhint %}
enable이 true이면 모바일 환경에서 펀치 버튼이 추가됩니다.
**파라미터**
이름
타입
설명
enable
Boolean
모바일 펀치 버튼 활성화 여부 ( 기본 값 true )
**예제**
Q 버튼을 눌러 모바일 환경에 펀치 버튼을 추가/제거 해보기
```jsx
let punchButton = false;
// Q 버튼을 누르면 동작하는 함수
App.addOnKeyDown(81, function (player) {
if (!punchButton) {
punchButton = true;
App.putMobilePunch();
} else {
punchButton = false;
App.putMobilePunch(false);
}
});
```
***
### putMobilePunchWithIcon
{% hint style="info" %}
App.putMobilePunchWithIcon(icon: ScriptDynamicResource)
{% endhint %}
로드한 이미지로 펀치 버튼을 만들어 추가합니다.
**파라미터**
이름
타입
설명
icon
ScriptDynamicResource
App.loadSpriteSheet 함수로 로드한 이미지 리소스
**예제**
Q 버튼을 눌러 모바일 환경에 로드한 이미지로 펀치 버튼 추가하기
펀치아이콘
```jsx
const punchIcon = App.loadSpritesheet("punchIcon.png")
// Q 버튼을 누르면 동작하는 함수
App.addOnKeyDown(81, function (player) {
App.putMobilePunchWithIcon(punchIcon);
});
```
***
### 부록
[자바스크립트 키코드 표](/creator/reference/keycode.md)